Important note: PPTP support is going to be removed in 2019. Refer to other, more secure connection types. Also, Windows XP is no longer supported.
Steps to connect via PPTP VPN on Windows XP:
Warning: Please be aware that PPTP has been considered insecure for a few years already and we don't recommend to use it for anything sensitive. It is a good choice for geo-unblocking, but nothing else if privacy and security are top priorities for you.
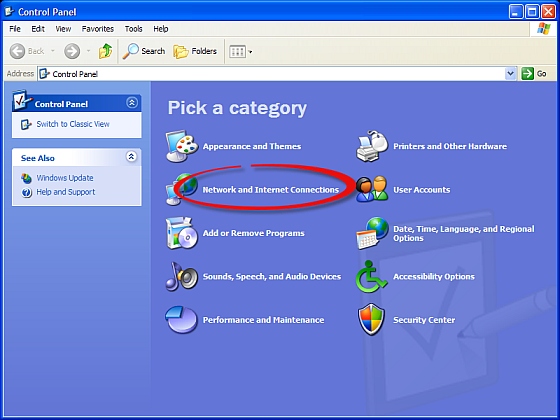
1. Open Control Panel > Network and Internet Connections
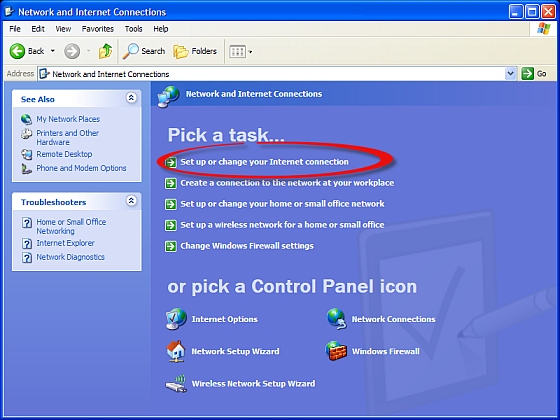
2. Click on Set up or change your Internet connection
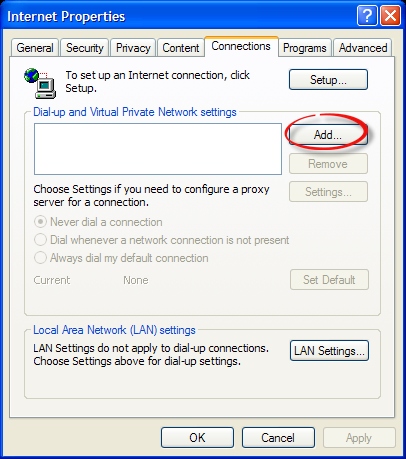
3. Click on the Add button in the window that pops up
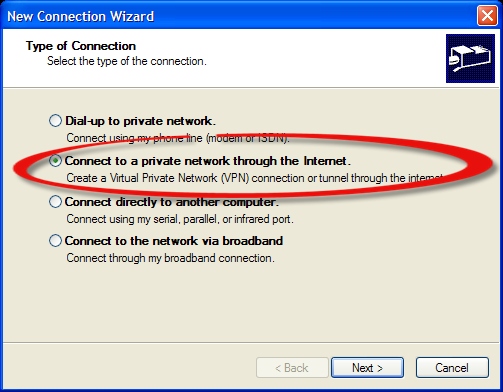
4. Select Connect to a private network through the Internet in the following dialog box and click Next
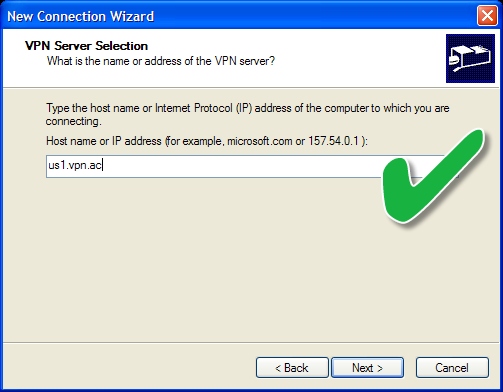
5. In the
Host name or IP address box, enter the VPN node you want to connect to, such as us1.vpn.ac, uk1.vpn.ac etc. (see
FULL LIST)
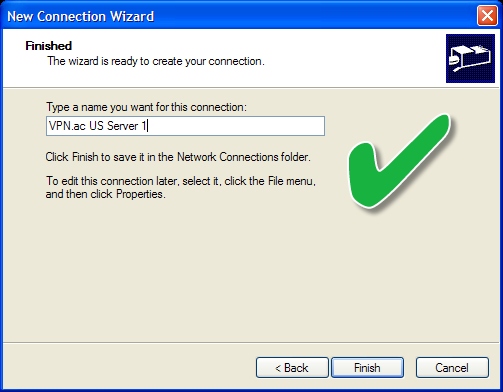
6. In the following dialog, type a unique name for the connection you are creating. This can be anything, for example "VPN.AC PPTP" or "VPN.AC US Server 1" and click Finish
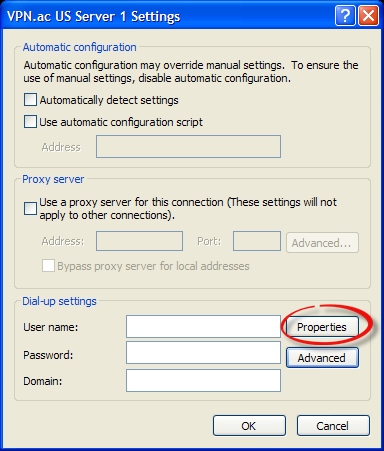
7. In the following dialog box, leave everything unchecked and click on the Proprieties button.
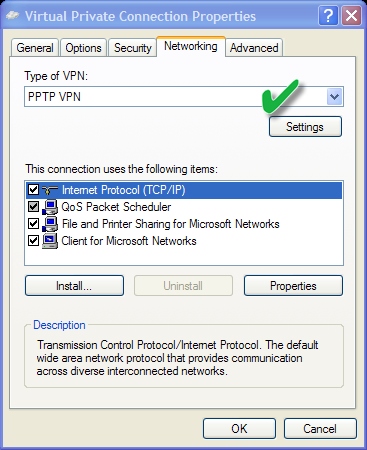
8. In the next dialog, go to the Networking tab and choose: Type of VPN: PPTP VPN
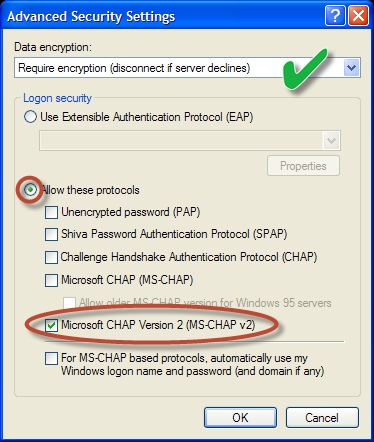
9. Now go to the Security tab and check the Advanced (custom settings) box and click on the Settings... button
10. In the following dialog, select Require encryption (disconnect if server declines) from the Data encryption drop down menu.
-Check the Allow these protocols box, if it is unchecked. In the list under this option, make sure to check ONLY Microsoft CHAP Version 2 (MS-CHAP v2) protocol.
12. Click OK until you go back to the Virtual Private Connection Settings Dialog
14. Click on the OK button twice to save all settings and go back to the Control Panel.
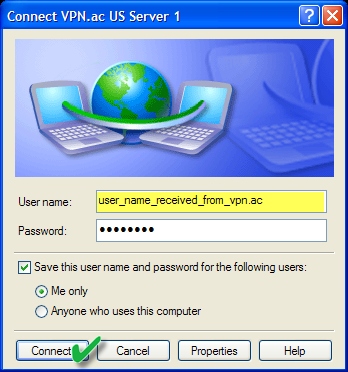
15. In the Control Panel, under Network Connections you will see the new Virtual Private Network Connection. Double click on it to bring up the dialer and insert the VPN User Name (usually your email address) and Password you have received by e-mail from us, then click Connect
1. Open Control Panel > Network and Internet Connections
2. Click on Set up or change your Internet connection
3. Click on the Add button in the window that pops up
4. Select Connect to a private network through the Internet in the following dialog box and click Next
5. In the
Host name or IP address box, enter the VPN node you want to connect to, such as us1.vpn.ac, uk1.vpn.ac etc. (see
full list)
6. In the following dialog, type a unique name for the connection you are creating. This can be anything, for example "VPN.AC PPTP" or "VPN.AC US Server 1" and click Finish
7. In the following dialog box, leave everything unchecked and click on the Proprieties button.
8. In the next dialog, go to the Networking tab and choose: Type of VPN: PPTP VPN
9. Now go to the Security tab and check the Advanced (custom settings) box and click on the Settings... button
10. In the following dialog, select Require encryption (disconnect if server declines) from the Data encryption drop down menu.
-Check the Allow these protocols box, if it is unchecked. In the list under this option, make sure to check ONLY Microsoft CHAP Version 2 (MS-CHAP v2) protocol.
12. Click OK until you go back to the Virtual Private Connection Settings Dialog
14. Click on the OK button twice to save all settings and go back to the Control Panel.
15. In the Control Panel, under Network Connections you will see the new Virtual Private Network Connection. Double click on it to bring up the dialer and insert the VPN User Name (usually your email address) and Password you have received by e-mail from us, then click Connect